Thursday 5 June 2014

Character Project - Creation via 3DS MAX

Using 3DS MAX

I started off creating the character beginning with the head, by using a box and converting it to an edible poly, then added the "beard" by selecting a side of the polygon to edit and using the "bevel" tool and then I extruded and continued to do this to form the characters neck, body, arms and legs of the character. 

I added the modifier "HSDS" to get the rounded shape >>

I was able to modify the size of the arms, legs etc by using the scale tool. 

 The next stage was to add texture to my character, I spent alot of time checking out different maps and how they looked on my rendered character and eventually i decided on adding a ''swirl map" because I thought it was most fitting to the original plan I had for him. 


I am not overly happy with my final outcome of my character, I think I require a lot more practice with 3DS MAX and I think if i was to re-do the character I would start my using the box to create the body first and instead of using the extrude tool, I would add to his body with other objects. 

Wednesday 4 June 2014

Developing my Designs - 3D Character Project

Developing my Design

Time Guardian 


I started brainstorming for this project by looking at types of art work that followed the theme of "Time" 


...and I also started sketching a few things I associated with time like clocks, stopwatches, hourglasses and because I wanted my character to look ancient I looked at images of sundials too and attempted sketching some of these things.   


I thought of how I could incorporate these elements in to my character, because we our modelling our family after the 'Toonix' style I was worried how to make the character detailed. So I thought about using a staff to symbolise his power over time and attempted a few designs of a staff that had an hourglass, clock etc  


The next step in my design process was creating the characters face, again because 'toonix' has very simplistic features, really just big black eyes and a mouth, I thought it would be difficult to express his personality of "Fearless"  


I decided to draw a beard on, because when I pictured my character I thought of 'Father Time' or a wise old wizard.. I like the long beards because I think it defiantly adds to his personality.


These were my first designs for my character.......


Designs continued.. 

I sketched a few more ideas for my character, and then I scanned the sketches and imported them to 'Adobe Photoshop' so I could edit the colours and get a better idea of how my character would look digitised. 

 4)

 5)
6)


7)


8)


This was actually my favourite of all my designs but I thought it would be too difficult to create the characters head with the protruding cogs, using 3DS MAX


3D Character Project - Ideas and Theme


Ideas and Theme for 3D Character

For our second assignment, we have been tasked with creating, designing, developing and delivering a model of a 3D character, based around set constraints. This assignment made me very excited as character development is something i'm really interested in.

This is a group project, and my other group members are:

  • Melissa Hull
  • Patrick McCallion
  • Holly McLean
  • Caroline Gilliand
  • Jennifer Lynch

We based our theme on "The Japanese Elements" usually, Wind, Earth, Fire and Water but seeing as we had 6 people in our group we added another two elements.. "Space" and "Time" 
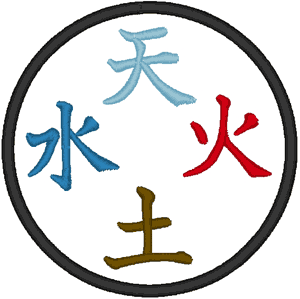


My chosen element was "TIME" and we settled on creating "guardians" of these elements,

The descriptive themes are a type of personality, since designed characters tend to reflect their personalities in their appearance, the descriptive theme is probably the most influential constraint in regards to the characters outward design. 

I decided my character would be C, Fearless
I chose this because basically it was the most suited to my character, I have already decided on modelling him to look like a wise old man because my initial thought for him was "Father Time"                                                               
The next constraint to conform to is the floor-to-legs, legs-to-abdomen and abdomen-to-head cross sections.  

So really how the characters neck, body and footprint are shaped. I chose i for the neck, as my characters head is going to be quite large. The waist is M, as it's most human like. The footprint i chose R because his legs are just going to be rounded.


We also had decided as a group that our "family of characters" would be modelled after TOONIX style 

Like this little guy above, based on this our proportions would fit closer toas it is small legs, small abdomen and large head


So my final code is CIMRT 


Cutlery Project

Dino Dining

This is a render of my final design for a new range of children’s cutlery that are made to look like dinosaurs, in order to encourage children to eat.
pic

Features

The fork features a sensor in the prongs, so when the fork is pressed into an item of food the speakers at the end of the handle will create dinosaur noises. It will be powered by a small battery also in the handle. It will ideally encourage children to eat with their fork as they will want to hear “the Dinosaur roaring.” I also thought a rubber grip would be useful as not all young children are aware on how to use a piece of cutlery correctly.

Formulating the idea

I started off this project by quickly brainstorming issues I would like to challenge when it comes to children eating. I knew most kids are very fussy when it comes to trying to feed them, especially healthy things. I wanted to create a piece of cutlery that would make eating more enjoyable and “fun” for young children.

Below was the start of my concepts. I tried as many different designs as I could possibly think of. 

I had lots of fun thinking of what I would have enjoyed when I was younger. I’m sure nearly every person was encouraged to eat as toddlers by their parents by ” here comes the plane” and “choo-choo” sounds, so this was the spark of my idea to have speakers implanted in the utensil that could either play music or make sounds.


Ergonomic issues 
I looked at how children’s cutlery is designed currently, and realised usually have rounded edges, obviously for safety and the way kids fork ends are because I noticed how they can range to wide, short and blunt to thin, long and pointy.


< < I investigated ergonomic issues too, I watched how my nephew used his fork to eat and noticed how he held it clenched with his whole hand, I know toddlers don’t have the same level of hand co-ordination as adults
…..therefore I tried to come up with some solutions to this.

I had to look into the anthropometrics of a child as the cutlery I am designing wouldn’t be the same as your average size.